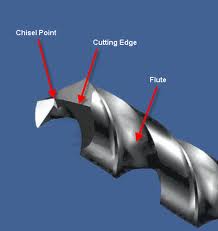
Last night I was working on a project in the shop that I have been putting off for some time. I needed to drill several holes in the piece I was working on but found out rather quickly that the drill bit I was trying to use was in serious need of sharpening.
There are several types of drill bits, each made to do a different job, so it’s important to select the right bit for the job. Even the right bit won’t help much if it is not sharp. The type of bit I’m talking about here is the standard twist bit or fluted bit. The really good bits are generally made by placing a steel blank in a computer controlled milling machine and cutting the flutes in the bit by rotating the bit as the cutter passes along the bit’s length.
Cheaper bits are made by actually twisting the bit after the flutes have been formed in a straight piece of steel. These types of bits are made with inferior quality soft grade steel. A good indicator of a cheap drill bit is if it bends when you’re using it. High quality bits will break if stressed too much.
My preferred method of sharpening a fluted bit is by using my bench grinder. A really high quality bit has such hardened steel that it is very difficult for me to sharpen them with a whetstone. Here are some tips to help you get your bit back to tip-top shape for your next drilling job.
1. Always wear eye protection.
2. Keep a small container of water near the grinder for cooling the bit. An overheated bit is renderend useless very quickly.
3. Always rest the bit against the grinder rest to prevent the bit from being pulled from you hand.
4. Lightly touch the bit to the grinding wheel for a very brief period and then dip the tip of the bit into the water. You do not want steam coming from the bit when dipped in the water. This is a good indication that the bit has gotten too hot.
5. Rotate the bit against the grinding stone in the same direction the bit turns when drilling.
6. The cutting surface of the bit must slope slightly away from the cutting edge. If this surface is sloped toward the cutting edge, the bit will simply rub on the surface and never start cutting.
7. Maintain an angle of approximately 30 degrees taper from the point to the sides of the bit.
If you follow these guidelines, you can test to see if the bit is sharp by dragging the edge along your fingernail. If the edge grabs at the nail, the bit is sharp. If it merely slides on the nail with no resistance, the bit needs more work.
Well I’ve got my bit sharp again so I’m ready to get to work. So until next time, stay safe, work hard, and as always, thanks for stopping by.


I’ve recently started a blog, the information you provide on this site has helped me tremendously. Thank you for all of your time & work.